
Imagine you had one inbox where you could see all enquiries coming in from your website and be able to deal with the ones that are only relevant to you...
Well with your EnquiryBot inbox, that's exactly what you have.
In this article, we are going to cover the following:
Enquiry statuses (New, Open, Closed, Archived, Priority, Unassigned)
Products
Activity
Searching & filtering enquiries
Assigning and moving enquiries
1. The inbox basics (All enquiries and my enquiries)
When you receive an email notification for a new enquiry and click the link in the email, you will arrive at that enquiry in your inbox.
In the inbox when you log in you will see 2 tabs at the top.
All enquiries
This tab will show you all your enquiries. This means any enquiries that have come in from your enquirybot or that have been added in manually. It doesn't matter which pipeline they are in, they will all show here.
All team members will see this when they login.
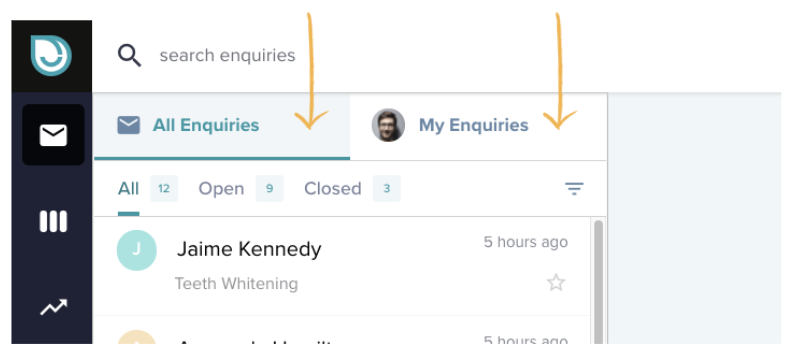
My enquiries
This tab will show you any enquiries that are being sent to you by way of email notification and any enquiries that are assigned to you. This will allow you to see only enquiries that you are dealing with.
It's important to note the difference between "Sent to you" and "assigned to you."
Sent to you means those enquiries where you are getting an email notification when the enquiry comes in (multiple team members can be sent the same types of enquiries).
Assigned to you means those enquiries that have been either automatically or manually assigned to you. An enquiry can only ever be assigned to one person at a time.
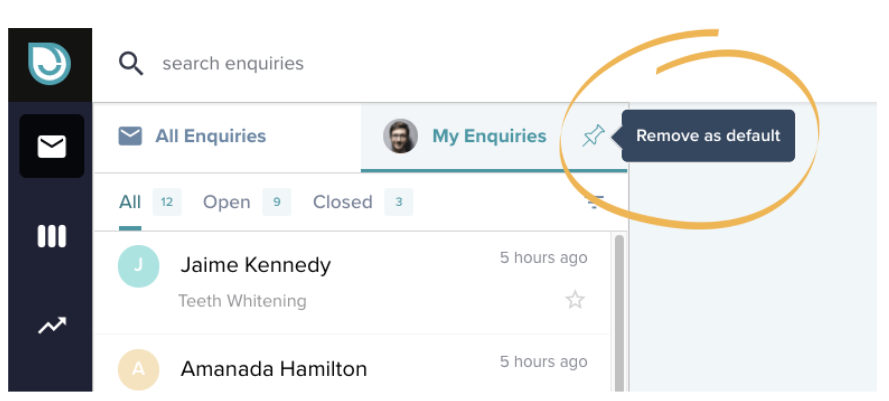
If you want the "My enquiries" tab selected by default when you come to you inbox simply click on "My enquiries" and hover of the tab with your mouse. Then click the "pin as default" icon.

To remove it and default back to the all enquiries tab, hover over it again, and click the icon again.
2. Enquiry statuses (New, Open, Closed, Archived, Priority, Unassigned)
An enquiry can have a number of statuses. Below we will explain each one
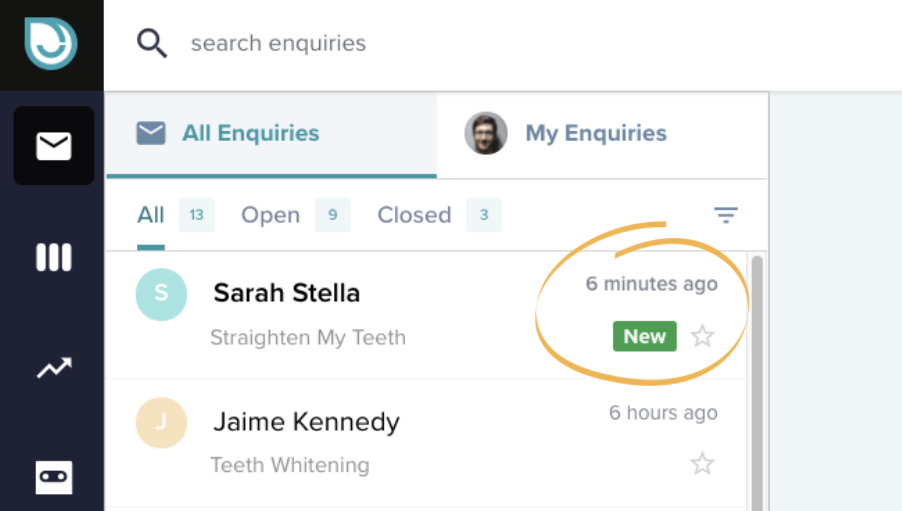
New
When an enquiry comes in from your EnquiryBot it will go straight into your inbox and the status of the enquiry will be New until it is read. Once read the new status goes away and the enquiry is now in the open status.
Open
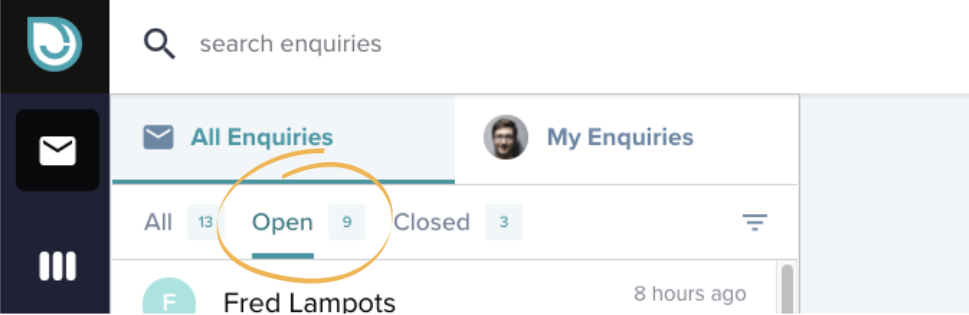
When you read an enquiry it automatically goes to open status. The status of open means that the enquiry is being dealt with by a member of the team or has not been closed yet.
To see all your open enquiries click the open tab
Closed
An enquiry is closed when you click the close icon either on the top right-hand corner or on the hover of the enquiry card in the left-hand column.
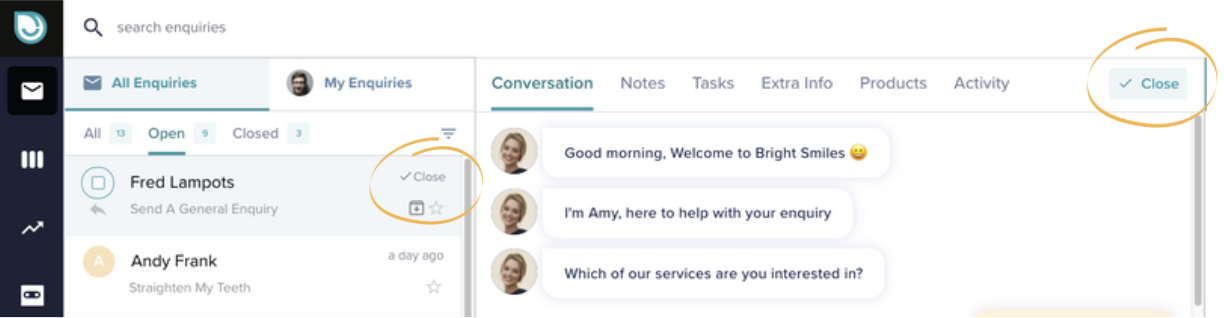
Close status means you are done dealing with the enquiry and it's no longer active.
If you close an enquiry and a customer replies to a message you might have previously sent, then the enquiry will automatically reopen.
If you want to manually reopen the enquiry, simply click reopen on the top right.

Archived
If you would like to remove an enquiry from the inbox so you don't see it in All, Open or Closed, you can archive an enquiry. It is not deleted, just archived and out of the way in case you want to bring it back again in the future.
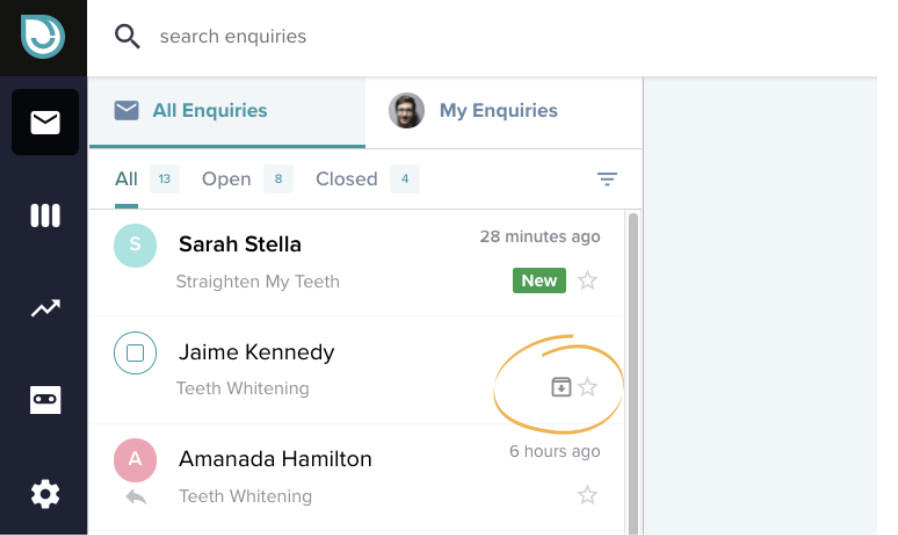
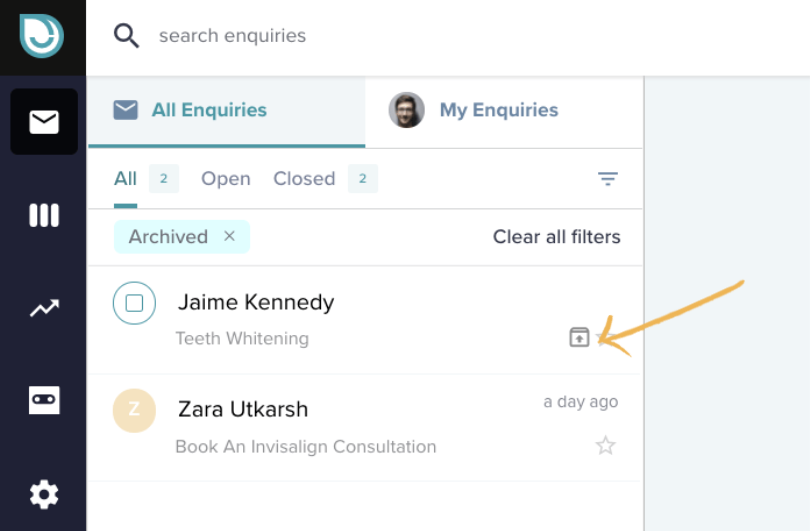
To find archived enquiries and to unarchive them click on the filter and select archived.
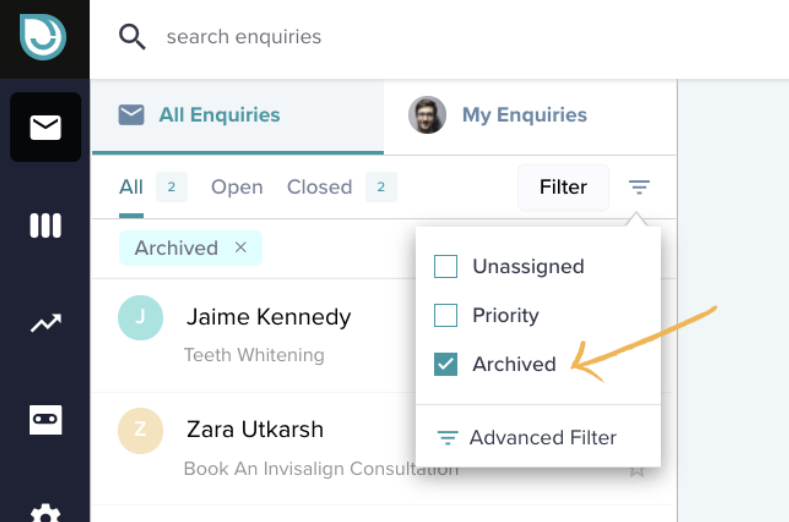
Hover over the enquiry and click on the "unarchive" button. The enquiry will then be unarchived and show in the relevant tab again.
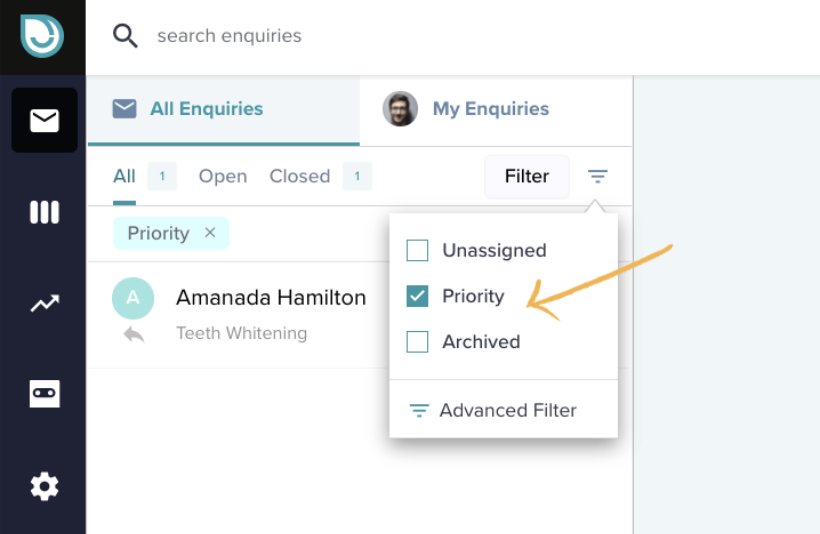
Priority
You can mark an enquiry as a priority if it's an important one for you and you'd like to be able to filter and find it in the future. To mark an enquiry as a priority simply hover over it and tick the star. To unmark it, just click it again.
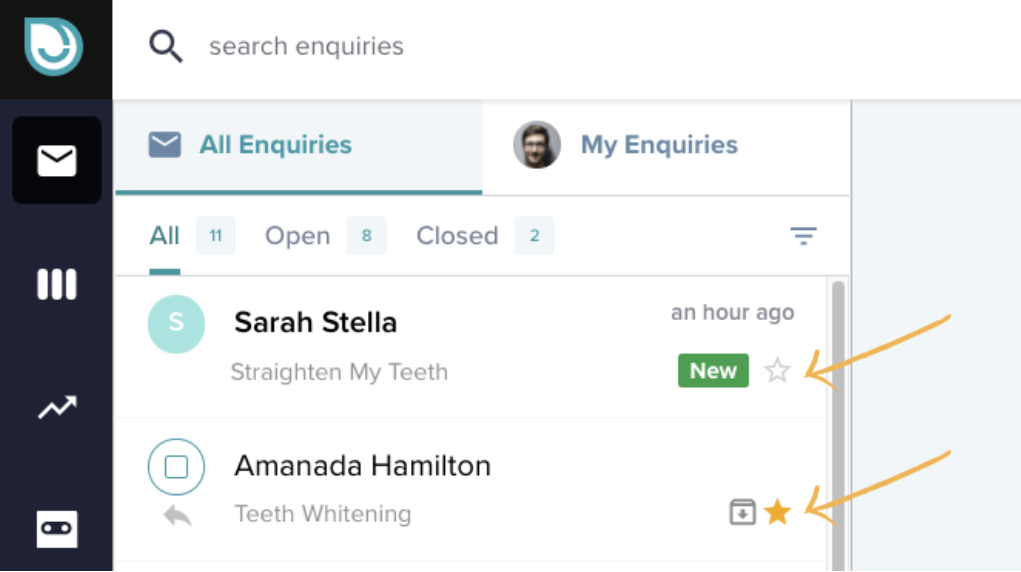
To find your priority enquiries, click on the filter and select "Priority".
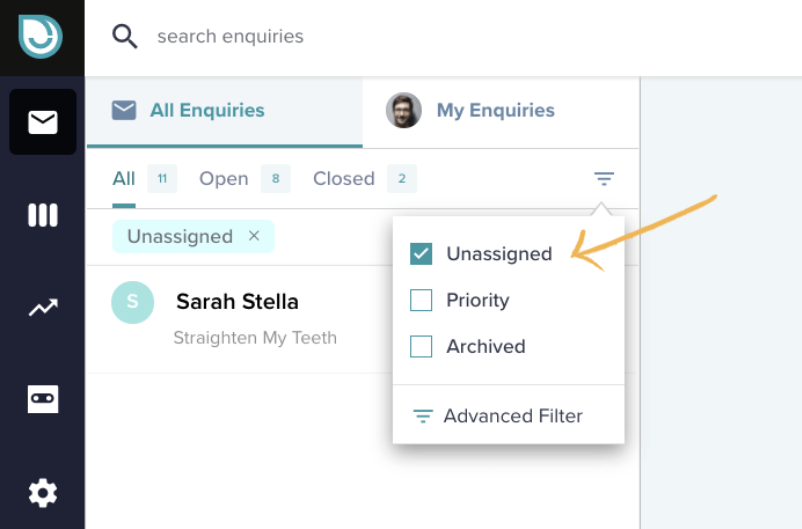
Unassigned
An unassigned enquiry status means it has not been assigned to anyone yet. To find all unassigned enquiries click on the filter and select unassigned.
3. Replying to an enquiry
When an enquiry comes into your inbox or you manually add an enquiry in, you can easily reply to the enquiry by email.
Step 1. Click on the relevant enquiry and then click "Write your reply here"
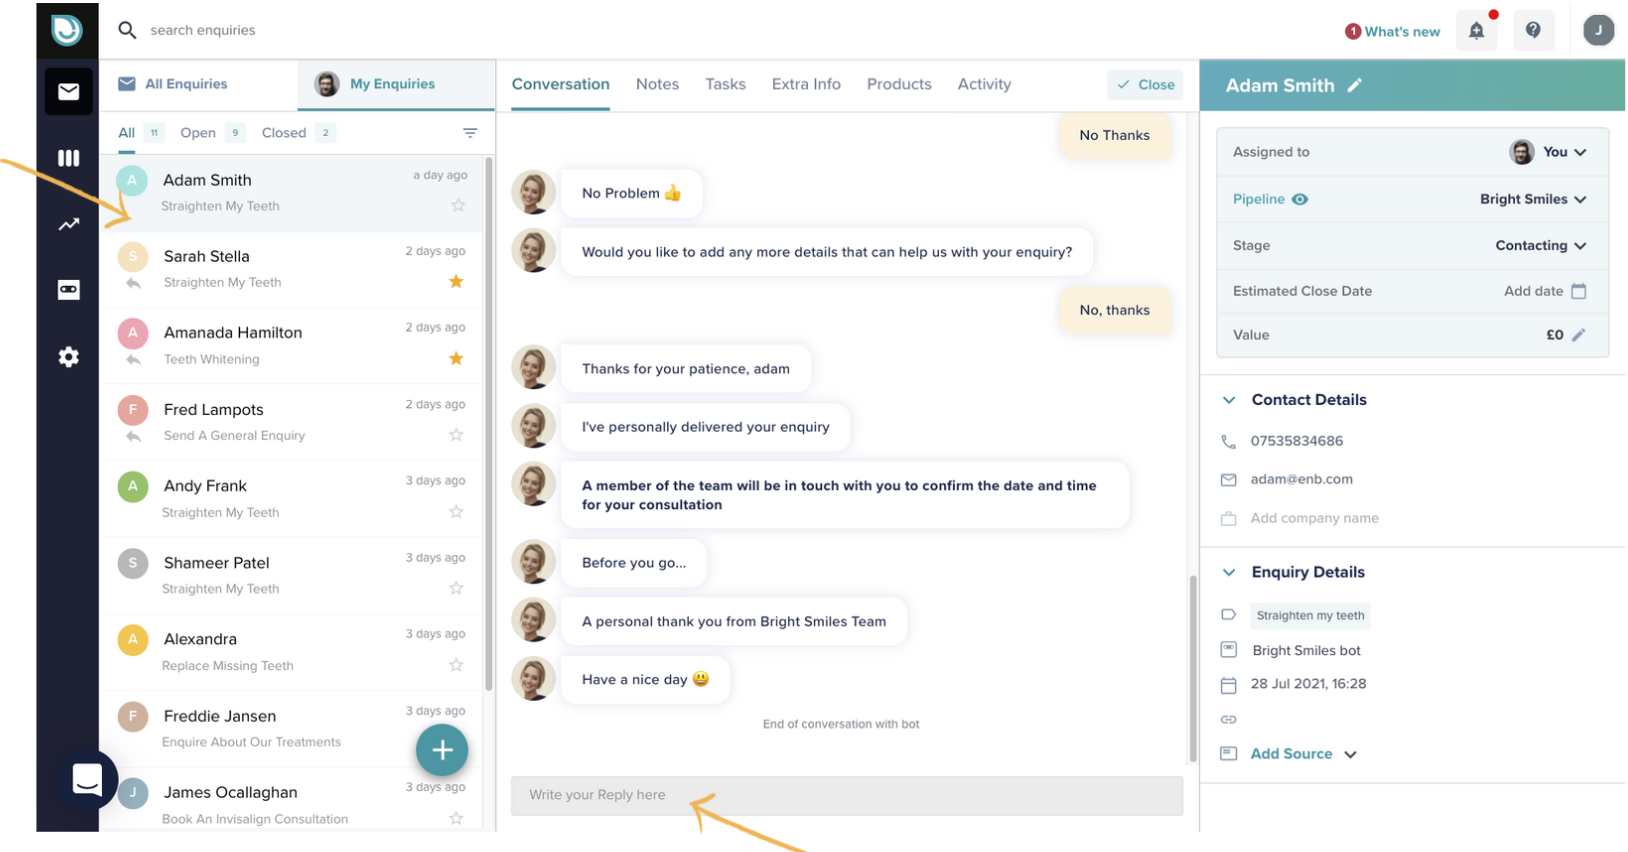
The email editor will pop up. In the editor simply type your message and hit send. By default, the email of the customer will be added to the To: field. You can also cc another member of the team or change the subject of the email.
By default, we add in "Your recent conversation with [business name]
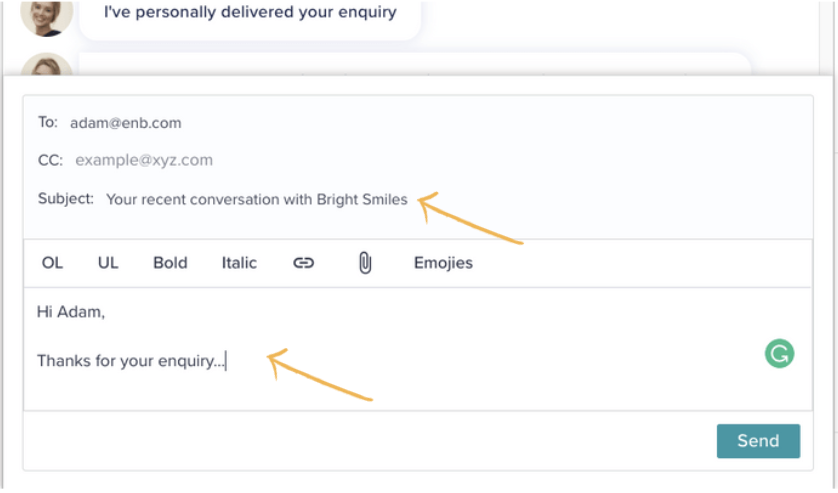
You can also add an attachment to the email reply by clicking on the attachment icon and uploading your attachment.
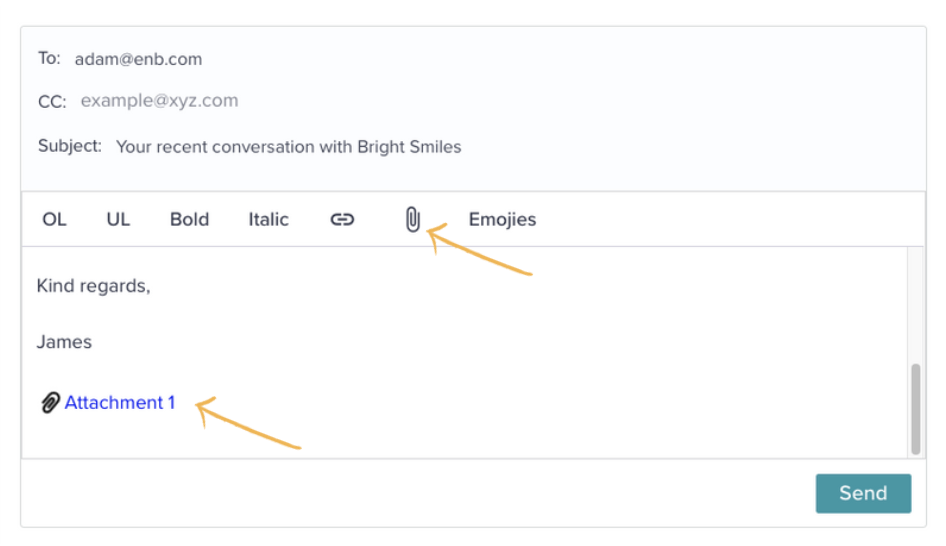
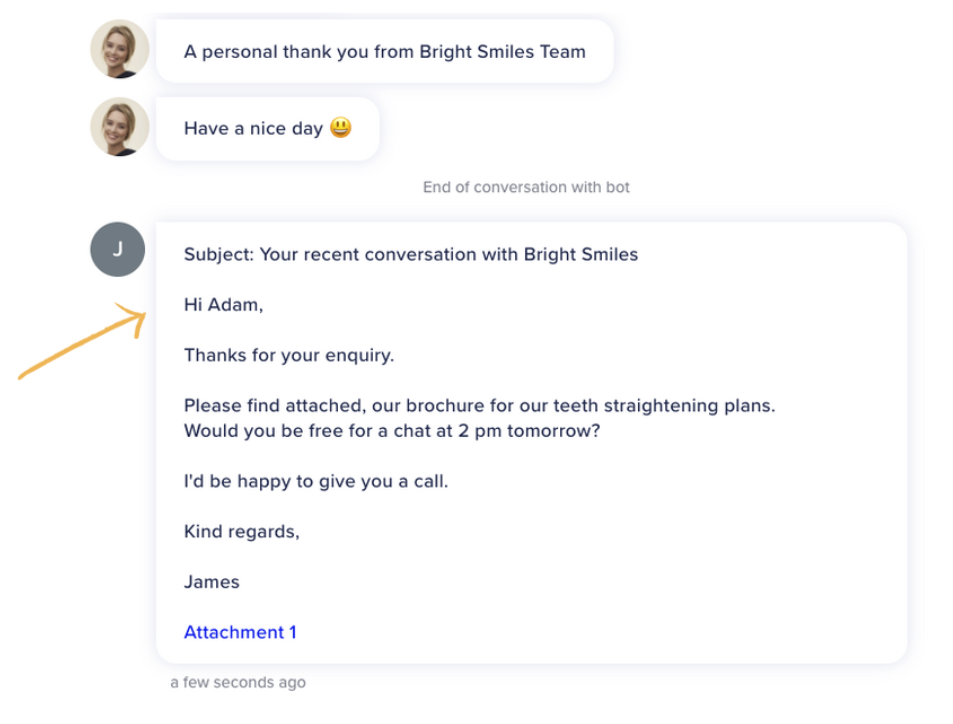
When you hit send, the reply will pop into the conversation thread so you can track the history of the conversation with the customer.
What happens when you send the email? What does the customer see?
The customer will receive the email in their inbox like the example below. The name from which the email has come from will be your user name. The email address from which the email comes from is inbox@enquirybot.com
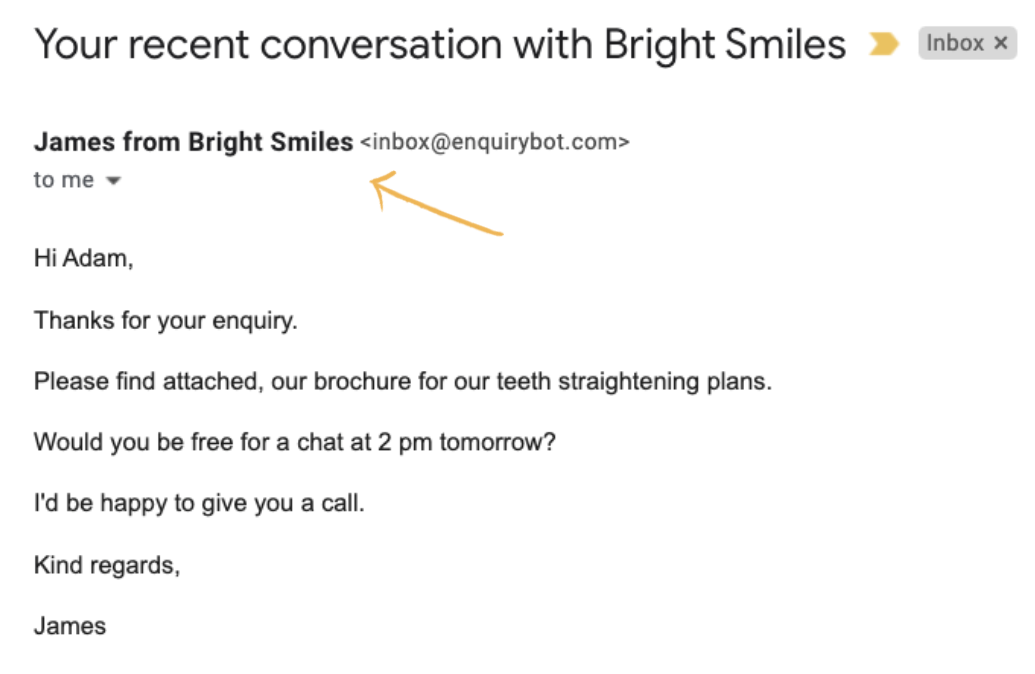
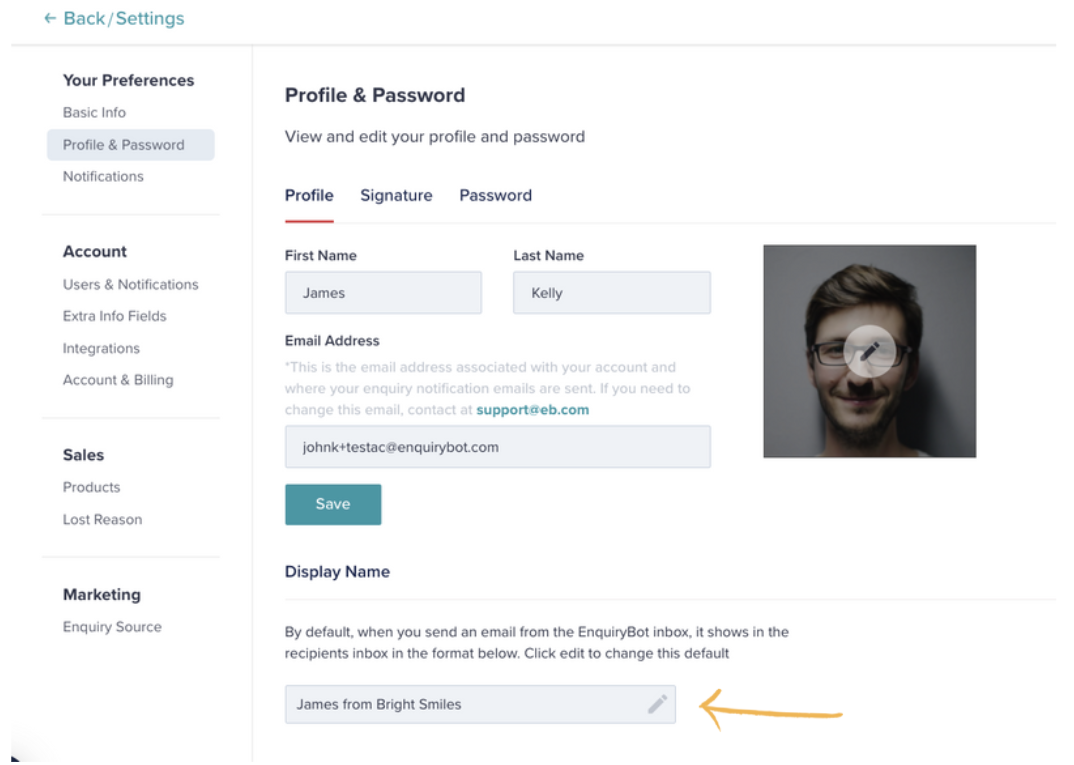
If you would like to change the for example how the from name appears "James from Bright Smiles" you can do that in your settings section under profile and password in the display name section.
What happens when the customer replies to the email that you sent from EnquiryBot?
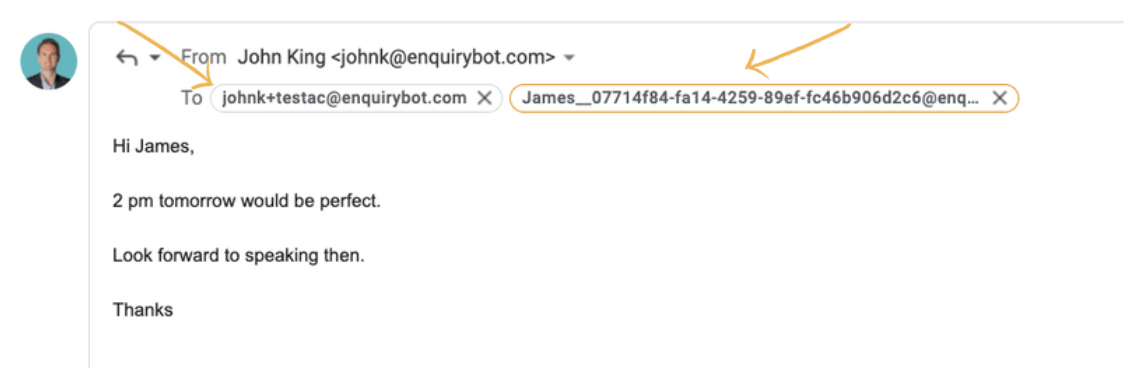
When the customer replies to the email they received from you 2 email addresses will be added automatically to the reply.
The first is your own email address that is associated with your account and the second is an email address for that enquiry.
The reason for this is so that the response can be sent into the enquiry thread on the conversation inside EnquiryBot.
When the customer replies back you get 2 emails.
One email to your own email address that is associated with your account and the second email is a notification from enquirybot that you have received a reply.
If you click that email it will bring you into the enquiry into enquirybot where you can respond to it. You will see the customer response on the conversation thread.
4. Notes
Adding a note to your enquiry is a great way of keeping track of your communications with your customer.
Adding a note in EnquiryBot is easy and there are a number of ways you can do it.
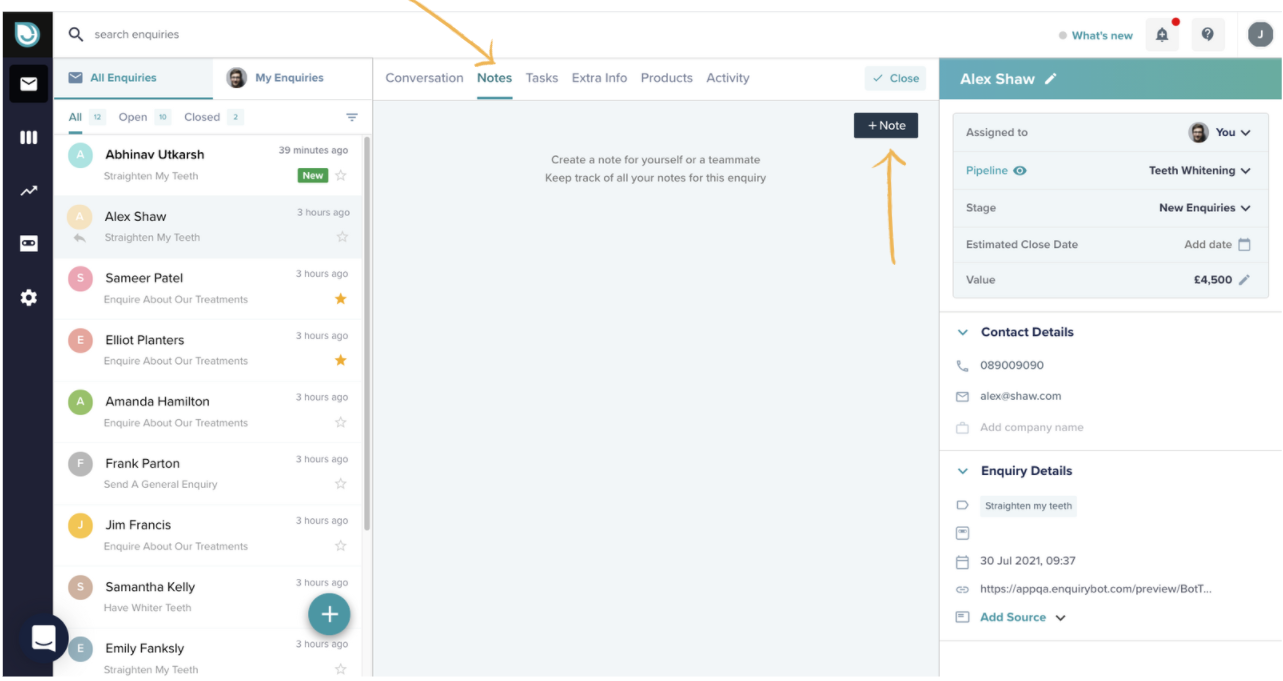
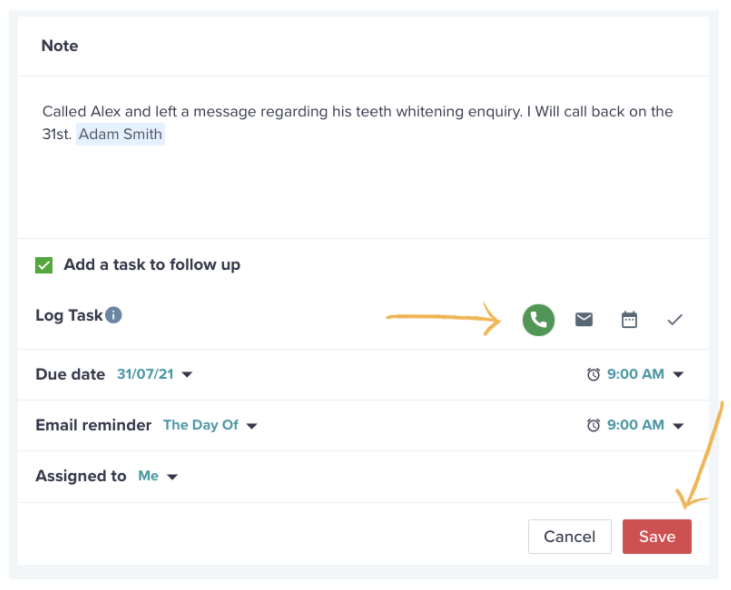
The first way is right within the enquiry itself. Go to the notes tab within the enquiry in your inbox and click + Note
Now simply type out your note, you can type @ and search your teammate's name if you would like to tag them in the note so that they are notified.
With a note, you can also add a task to follow up if you want to remind yourself or a teammate to take an action regarding this enquiry.
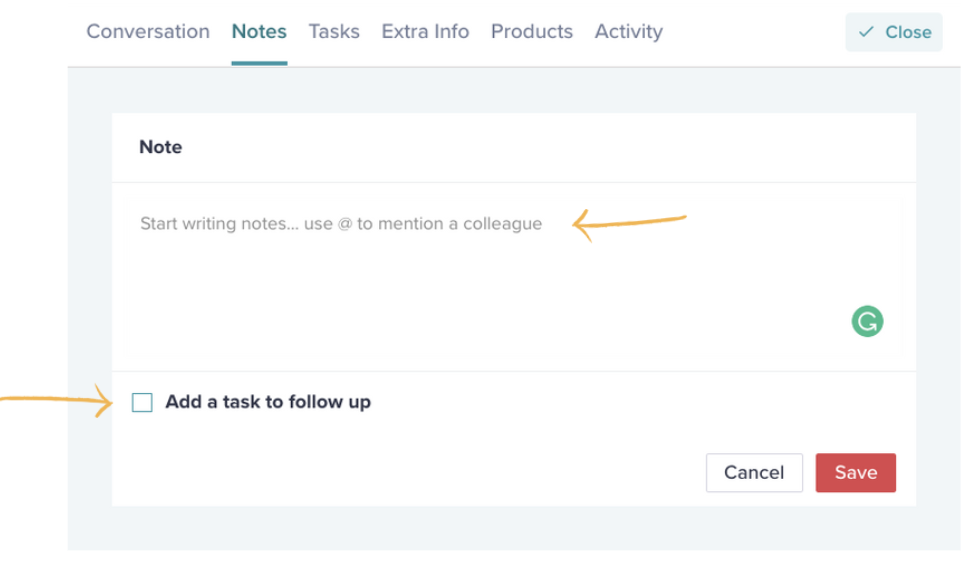
Simply click the "Add a task to follow up" box and select your task type, set a due date and reminder. You can even assign the action to another team member.
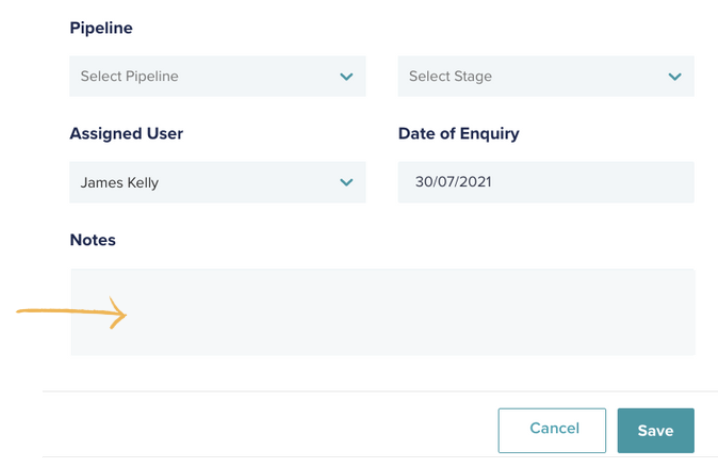
The second way to add a note is to add the note when you are adding in a manual enquiry. On the bottom of the add enquiry form, there is a box to add a note. Once added it will add it to the notes tab within the enquiry itself.
5. Tasks
When managing your enquiries you can add tasks to remind yourself or a teammate of the next action you need to take with this enquiry.
For example, you receive an enquiry, give the person a call and leave a message. In this case, you may want to set a task and reminder for yourself to follow up with this customer again.
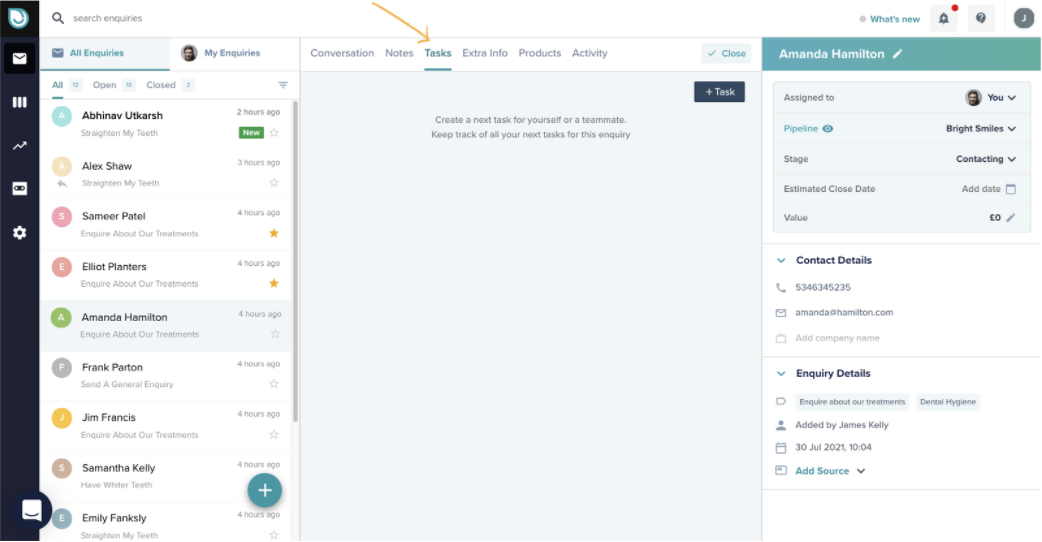
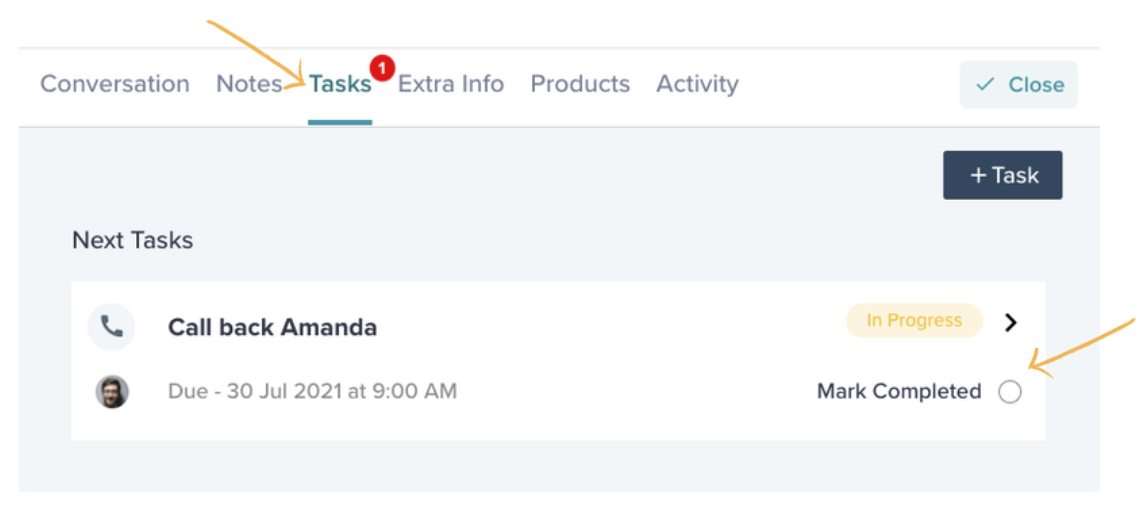
Step 1. Select the enquiry you'd like to add a task for and click on tasks on the top section of the enquiry card. Then click + Task
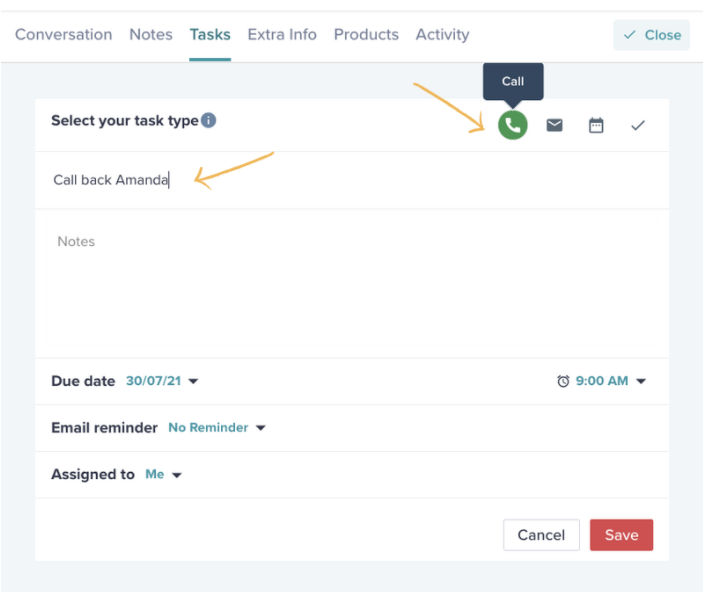
Step 2. Select the type of task you would like to add. The options are (Call, email, meeting, to-do)
Give the task a name, for example, "Call back Amanda"
You can also add a note to this task to help you remember the context of it.
Set and due date, email reminder and choose who to assign the task to. Then click save
Step 3. Once the task is saved it will show like this, to mark the task as completed click "Mark Completed". If you want to edit the task or view it simply click on it and it will open up.
6. Extra info fields

Your EnquiryBot has been designed to collect the most relevant information from your website visitors to deliver a qualified enquiry to your inbox.
But sometimes throughout your follow up or sales process you need to collect and add more information to the enquiry.
That's what extra info fields are. They are fields that you can input extra info about that enquiry into.
In this article we'll go through:
How to setup extra info fields
Where do I find the fields and populate them once added?
Some use cases
How to setup extra info fields
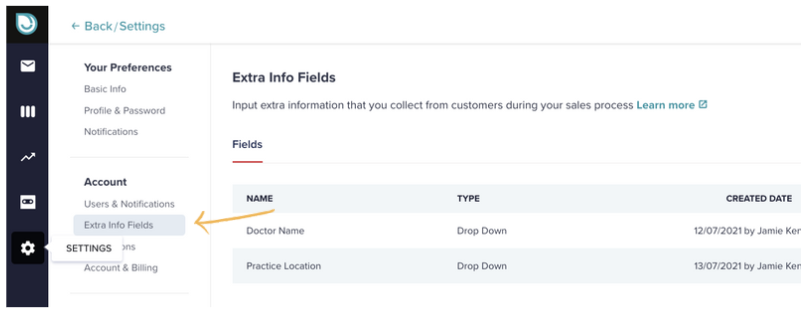
Step 1. Go to your account settings on the left-hand menu and select Extra Info Fields
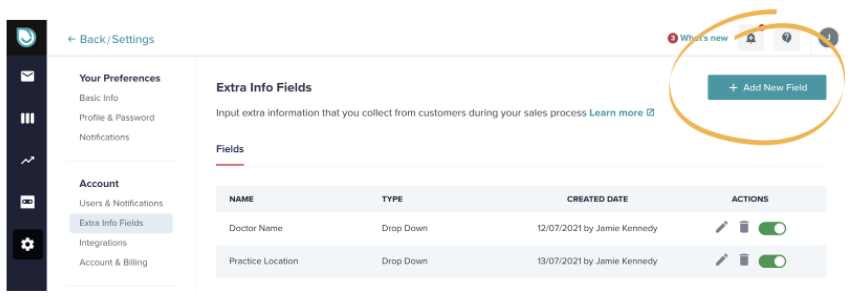
Step 2. On the top right click the Add New Field button
Step 3. Add the fields details and setup visibility:
Field name - Add the name of the field, for example, "Appointment Date". It could also be, for example, Office location. Anything that will help you identify it.
Description - This field is optional but is there if you would like to add some further details or directions. This will show as a tooltip on the field name when added.
Field Type - We have 5 field types to choose from. Date, dropdown, text, number & tickbox
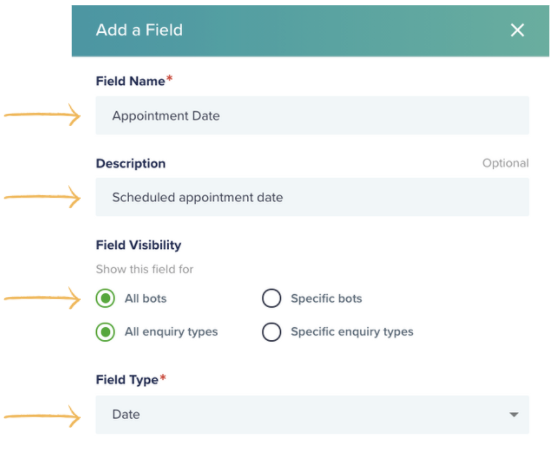
Field Visibility - This setting controls when you want to show this field. You can show it for all bots or specific bots if you have multiple on your account.
You can also choose to only show this field for specific types of enquiries. This is really useful if you have specific info you need to fill in for specific types of enquiries.
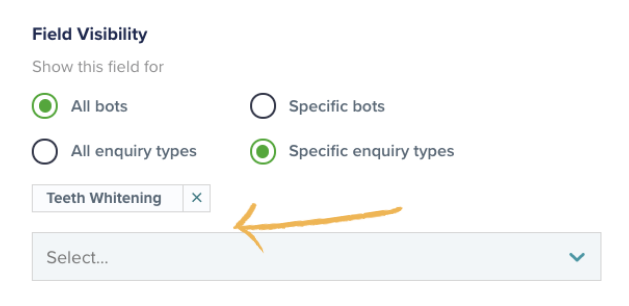
In this case, you just need to select the enquiry types you would like to show this specific field for. It will only show for that enquiry type when you open the extra info field tab on the enquiry itself.
Step 4. You can now click Save or Save and add another.
Where do I find the fields and populate them once added?
On your enquiry cards
Once added your extra info fields are on the Extra info tab when you open up an enquiry either in the inbox or in a pipeline.
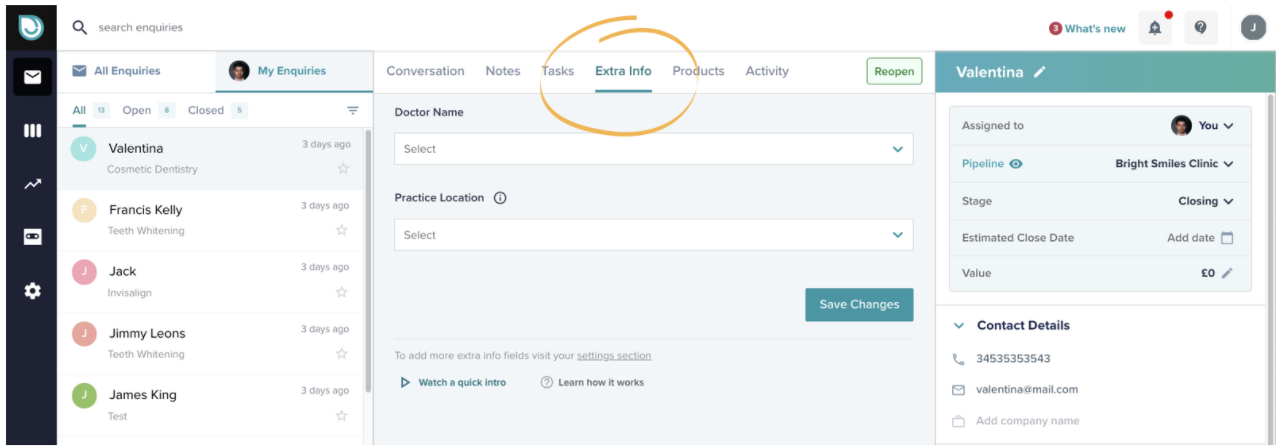
To populate the fields simply click and fill them in or select the relevant option and click save changes.
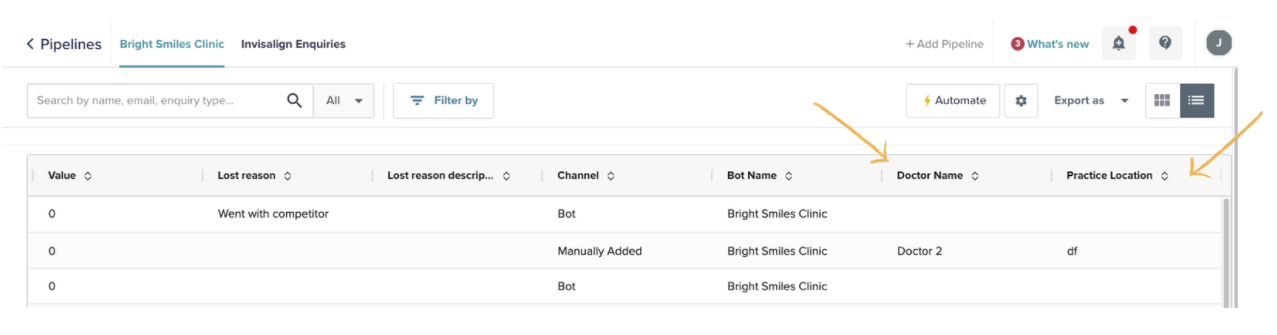
In the list view on your pipeline
Any extra info field you have associated with an enquiry in that pipeline will show here on the list view.
Some use cases
Example 1 - Sarah works for a hotel and wedding venue.
Sarah's EnquiryBot captures all the relevant information she needs to qualify the enquiry. The couple that enquired booked in a show round through the bot.
When Sarah showed them around the venue in person she asked them a number of other questions like the style and theme of wedding they were looking for, the type of food they wanted & the budget they had in mind.
Sarah had extra info fields setup for all these questions and once she finished her meeting she filled them in on the enquiry on EnquiryBot to keep it all in one place.